Showing posts with label best kitchen tips. Show all posts
How To Buy,Store & Freeze Fresh Cilantro
Cilantro is an herb and is sometimes referred to as coriander.Cilantro and Coriander come from the same plant, but they are not the same thing — although the words are often used interchangeably. "Cilantro" refers to the herb — the green leafy bits. "Coriander"refers the spice — the roots and seeds, which are usually dried.
It makes a good complement to spicy foods. Cilantro is commonly used in Asian, Mexican and Indian cuisines.Although it is usually just the leaves of the fresh cilantro plant that are used, the stems and roots are edible as well.Cilantro is typically sold in bundles of fresh leaves and stems or grown in the garden.
Cilantro is available year-round.Choose cilantro with bright,aromatic & evenly-colored green leaves, showing no sign of yellowing or wilting.If it has no aroma, it will have no flavor
1) As soon as you arrive home with fresh cilantro, remove the cilantro from the produce bag.
2)Pick out any wilted leaves & remove any leaves at the bottom of the stems. (You do not want the leaves in the water.)
1) Place the stems (with roots intact if attached) in a glass of water and cover the the top loosely with a plastic bag.Leave plenty of room for the leaves to breath but secure it tightly around the bottom of the glass with a rubber band and refrigerate.
2) When ready for use, simply pull out or snip off the desired amount and re-cover.
3)The water should be changed every 2 to 3 days and also pick out any wilted leaves when you do.
4)Do not wash the herb until you are ready to use it.This technique will keep your cilantro fresh for up to 2 weeks.
1) Gently rinse the bunch in cool water and let air dry.. I even pat them with a towel sometimes. Get them dry as possible.
2) Snip the tips of the stems with a pair of scissors/kitchen shears Or pick the leaves if you don't like using the stem part in your food.
3)After the leaves are completely dry i put them in a airtight ziplock container or freezer bag. Label them with name & date & freeze.
4) When ready to use just break the amount you need, give it a rough chop and add to your dish..Do not thaw before using.
Or
Place a small amount dry cilantro leaves in a single layer on a cookie sheet. When frozen, gather into a ziplock bag, returning to the freezer immediately. Use within 6 months.
More KITCHEN TIPS
Notes/Tips:-
Frozen cilantro is not great for garnishes, but it’s just fine for most recipes, including guacamole, soups, and any sauce that calls for fresh cilantro.
When freezing ,after picking the leaves, mix them with a small amount of olive oil... just enough to coat the leaves. Then pack into freezer bags and freeze for later use. The olive oil makes it really easy to separate the frozen leaves and also adds an extra flavor to the mix.
Frozen cilantro separates fairly easily and even in chunks chops easily on a cutting board.
You can also puree the leftover herbs(any) with just a little oil and freeze the puree in ice cube trays.
Cilantro can be frozen for upto 4-6 months.
Do not wash the cilantro until you are ready to use it, as it tends to go bad more quickly when moist.
Fresh cilantro leaves do not simmer well because heat diminishes their flavor quickly. The leaves should be removed from their stems and added to a dish just before serving. In fact, a very quick rough chop of the leaves will release the herb’s full strength of flavor; again, chop and use immediately.
Read More......
How To Clean Burned Food From Your Pots Or Pans in 5 Minutes ( Easiest & Quickest Way) With Step By Step Pictures
It happens with everyone , may be not as frequently as mine , but it does, one minute you are cooking something in a pot, then another minute you forget it or went to check your facebook and you ended up with a pot that's all black inside. I posted some tips before also on how To Get Rid Of Burned Food In A Pan, but this is the easiest, most effective and quickest way to get your blackened pot back to its shiny former self, because who has time to soak a pot overnight? This absolutely makes your life more easier specially in the kitchen :).
How To Clean Burned Food From Your Pots Or Pans in 5 Minutes
Ingredients:-
Burned Pot/Pan
Dish soap
Baking Soda
Water
Steel wool/pot scrubber or any cleaning sponge / brush
Procedure:-
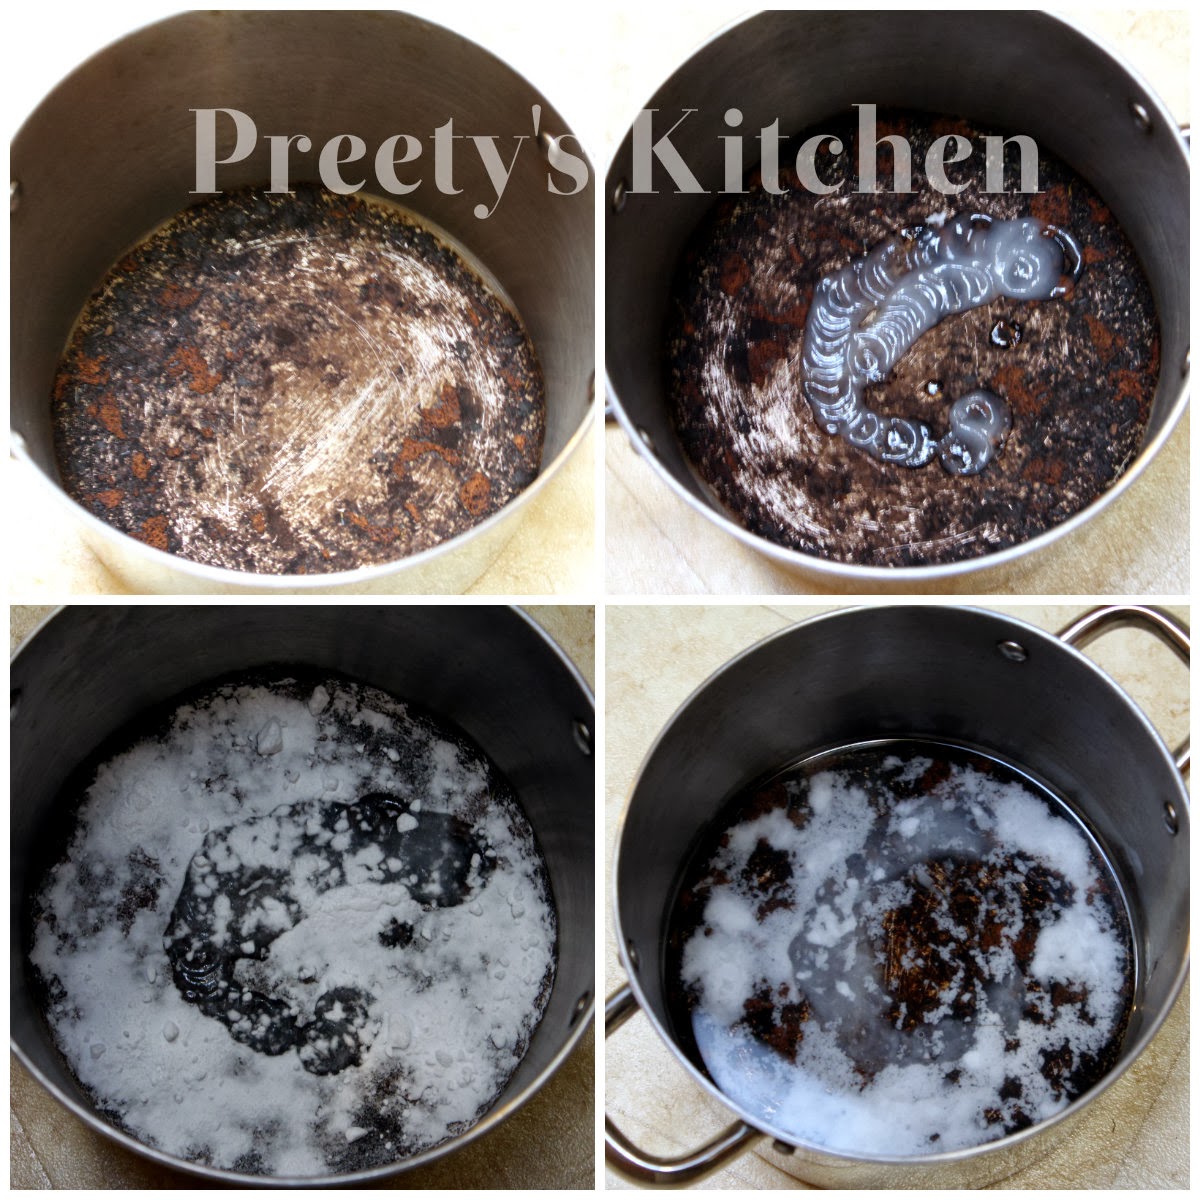
1)Put 1-2 tbsp of dish soap in the burnt pan
2)Sprinkle baking soda over it so that it covers the burnt area.
3)Partially fill the pot with water(ensuring all blackened areas are covered)
4) Put the pot on the stove and bring to a boil and allow the water to boil for couple of minutes.
5) Switch off the gas and empty the pot. You will notice at this point the all the burnt food will start coming off. ( Be careful the pot will be very hot , to cool the pot fast run it under the cold water in the sink).
6)Rinse and wipe clean with a steel wool /pot scrubber and it should look like new.
More KITCHEN TIPS
Notes / Tips:-
1) Always set a timer when you are cooking, even if you think you will remember to turn it off.
2) This method is for stainless steel pots and pans only.
3) If you're having trouble finding a method how to clean a burnt stainless steel pot that works for you, keep in mind that you may need to repeat these processes a few times in order to remove all of the built-up residue from your stainless steel pan or pot.
4) Avoid using steel wool or abrasive cleansers on polished metal. They can create scratches that will allow food to stick and burn even more easily.
5) Spray your pot with non-stick cooking spray. This will not help you from burning your dish but it usually helps release anything from the sides and bottom of your crock should you burn it.
Read More......
Basic Indian Style Tomato Gravy #VEGAN ( How To Make In Bulk And Freeze ) Step By Step Pictures
This traditional Indian Style Tomato Gravy can be used as a base for all sorts of vegetables or tofu . This is often referred to as a "curry". It is usually eaten with plain white rice or with Indian Bread Roti/Naan/Paratha.
How To Make Basic Indian Style Tomato Gravy In Bulk & Freeze For Quick Meals
Preparation Time:- 15 Minutes
Cooking Time:- 30-40 Minutes
Makes:- Gravy for 3-4 Curries approx
Recipe Source:- Preety's Kitchen
Ingredients:-
Oil:- 1/4 Cup
Cumin seeds:- 1 Tbsp
Bay Leaves:- 2
Garlic:- 1/8 Cup, chopped
Ginger:- 1/8 Cup,chopped
Onion:- 5-6 medium/small size, chopped
Tomato Puree:- 4 Cups ( Grind the fresh tomatoes until smooth to make tomato puree)
Salt
Turmeric Powder:- 1 Tbsp
Red Chilli Powder:- 1 Tbsp
Garam Masala Powder:- 1 Tbsp
Coriander Powder:- 1/2 Tbsp
Dried Mango Powder/ Aamchoor Powder:- 1/2 Tbsp
Cardamom Powder:- 1 Tsp
Nutmeg:- A Pinch
Cinnamon:- 1/2 Tsp
Brown Sugar:- 1 Tbsp
Procedure:-
1) Grind the onion ,ginger and garlic together in a food processor till you get a smooth paste.
2) Heat the oil in a medium-sized, heavy-bottomed pan on a medium flame. When hot add cumin seeds & bay leaf.
4)Add the onion , ginger & garlic paste you prepared. Fry until light brown in color and all the moisture from onion paste is gone.
4)Add the tomato puree, sugar and all the spices. Cook for 15-20 minutes stirring in between until the raw smell of tomatoes are gone and gravy is well cooked. Do the taste test and make any adjustments if needed.
5)Switch of the gas, let the gravy cool down .
How To Store / Freeze The Basic Indian Style Tomato Gravy
1) Label the bags and fill the gravy ( as much you need for one recipe individually) in the freezer safe zip lock bags or airtight containers.
2) Put all the bags in one big gallon size freezer safe bag to avoid any leakage and pop them into the freezer.
How To Use The Gravy From Freezer
When ready to use just take out one ziplock and put the frozen gravy directly in a pan and heat it on medium-low heat. As soon as it melted you can add anything of your choice like mix of precut frozen veggeis, or cut tofu or potatoes ,chickpeas and peas, etc.Let it come to a boil and do the taste test , adjust the seasonings if you want ( you can add any other seasonings if to like depending on what recipe you are making) and then switch off the gas. Sprinkle some cilantro leaves over the top and serve hot.
More Vegan Recipes & Kitchen Tips
Read More......
How ( 5 Ways ) To Reheat Leftover Pizza
Reheating the cold pizza using any of the methods mentioned below will bring that slice back to life and no longer will you have to eat it cold, rubbery, burnt, or flavorless.
Putting pizza in the refrigerator will break down the chemicals inside the dough, which gives it that bummer, tough texture the next day. Before putting the leftover pizza in the fridge, Wrap the pizza in plastic wrap, put it in a freezer bag or other container to avoid drying.
The USDA and other food safety experts recommend leaving pizza out at room temperature for no more than two hours.
How To Reheat Leftover Pizza
Toaster Oven Method:
HOW TO DO:-
Preheat over to 400 degrees
Put in slices on some foil for about 10 minutes or until cheese is bubbling.
Skillet Method:
HOW TO DO:-
1: Get a large skillet, and heat some olive oil until it is ready, over medium-high heat. You only need enough olive oil to coat the pan,
2: Reduce heat to medium/medium-low, and put pizza in the pan.
3: Cover the pan (very important or the toppings won't get warm), and let it cook for about 5 minutes.
A conventional oven is likely to give you the closest to original texture and taste for your reheated pizza slices. It’s also the most practical for reheating lots of slices at once.
HOW TO DO:-
Conventional Oven Method:
HOW TO DO:-
1.Heat a foil-lined cookie sheet in a 450°F oven until hot (high heat makes the crust crispy).
2.Arrange slices on the sheet and heat until the cheese is bubbly.
If it's cold (from the fridge), heat for 10 minutes.
If it's fresh but not hot, just heat for about 5 minutes.
This is the least favorite method to reheat the pizza but in case you don't have enough time to do any of the above method orjust feeling lazy..;)..then opt for microwaving ..
(The time will depend on what toppings you had and how cold it was in the fridge. It's done when the cheese bubbles.)
Microwave Method
HOW TO DO:-
Place a single slice in the microwave for only 10 to 20 seconds. Just enough to soften up the cheese and dough a little bit.
Per slice: 20 seconds in the microwave to warm up the bread then 30 seconds under the broiler to melt the cheese and crisp the topping.
OR
Per slice: 20 seconds in the microwave to warm up the bread then 30 seconds under the broiler to melt the cheese and crisp the topping.
Barbecue grill
works great for reheating pizza too if you have one at home
Labels:
best kitchen tips,
cooking tips,
easy,
how to,
leftover pizza,
pizza,
reheat
How To Make Perfect Okra/Bhindi (Slime-Free)
Okras long and elegant pods, also known as lady’s fingers, are high in vitamins A and C.Okra is cultivated as a vegetable and used extensively in Caribbean, Middle Eastern, Indian and Southeast Asian cooking. Okra's long distinct shape and tendency to get slimy or sticky sets it apart from other green vegetables.Certain cooking techniques will prevent your okra dish from being overly slimy.Okra can be cooked in a variety of ways, such as boiled, baked, breaded ,fried, microwaved & sautéed, and is also used in soups and stews. A common complaint when cooking okra is that it becomes too slimy. It is important to remember that you cannot avoid some slime when cooking okra. However, you can reduce the amount of slime by using tips mentioned below.
TIPS TO MAKE SLIME FREE OKRA
WASH WHEN READY :-Water enhances the sliminess so hold off on washing the okra until you are ready to cook them. After washing make sure to dry them really good..( I use a paper / kitchen towel to wipe and dry each okra before cutting).If your okra was refrigerated, bring it to room temperature first and pat it dry before slicing or cooking the okra.
LET IT DRY BEFORE COOKING:-Cut okra into rounds, diagonally or long slices. Once cut, put into the sun for at least 30 mins to dry and remove some excess moisture. Alternately, spread them on kitchen towel in single layer and leave it for few hours on your counter top at room temperature.It is a must that the okras are dried properly to reduce sliminess.If you are serving the okra whole as a side dish, and don't want the liquid to be released during the cooking, trim around the stalks in a cone shape, so that the pod isn't pierced. While chopping them; make sure that you have dry chopping board and knife. Keep dry kitchen paper next to you and clean the slime from knife using it whenever needed.
COOK LOW AND SLOW:- This i learned from my mom to cook okra on low heat without stirring too much. When sauteing okra, be sure that it is spread out in an even layer in the pan ( i always like to use non stick pan). If the pan is over crowded, the okra will begin to sweat and release moisture (slime).NEVER NEVER cover the pan while the okra is cooking. Covering the pot will cause steam and unwanted moisture.
ADD SALT LAST:-Add salt to okra only when it is just finished cooking. To add the salt, let the okra cook completely, remove it from the heat and then sprinkle salt to taste and toss quickly. If you add the salt at the beginning of the cooking process or during, it can result in a release of moisture (slime).
More KITCHEN TIPS
SOME OTHER TIPS TO REDUCE SLIMINESS OF OKRA
1)Soaking the okra in vinegar before cooking may help reduce the sliminess of the cooked vegetable.Rinse the okra with fresh water and pat the pods dry after the vinegar soak. Prepare and cook the okra as directed in the recipe. (soak them in water with 2 tablespoons of white vinegar for at least 15 minutes). ( I have yet to try this one).
2)Reduce the amount of slime by adding a teaspoon of lemon or lime juice or Dried mango powder or soy yogurt to okra while cooking.
How To Make Homemade Pancake Syrup ( Super Easy & Inexpensive )
Store bought syrups are not only too expensive but also full of corn syrup and other stuff that we don't even know.
Homemade Pancake Syrup is fast,easy to make, stores well in the fridge, and is healthier than store-bought pancake syrup (though of course it's still all sugar but atleast I know where all the ingredients come from!!)and no plastic bottle to recycle , also you can flavor it as you wish!This is wonderful.
Who knew making your own pancake syrup could be so easy!
Ingredients:-
Brown Sugar:- 1 Cup ( See My Post On How To Make Homemade Brown Sugar)
Water:- 1/2 Cup
Maple Flavoring of your choice:- 1 Tsp
Procedure:-
1) Mix Brown Sugar and water in a saucepan.
2) Bring mixture to boil, let it simmer for about 15 minutes. Don't let it boil again or overcook.
3) Add 1 Tsp or so of maple flavoring to suit your taste and serve.
OR
Add a little water and a dab of butter to fruit jelly and heat over low heat for a short time.You will get a delicious fruit syrup.
More KITCHEN TIPS
Notes:-
1) You can flavor the syrup after removing it from the burner ( like with vanilla or almond extract, maple extract, orange zest, lemon zest) OR If you like fruity syrup, you can add some frozen berries after turning off the burner, and leave the pan on the burner (remember, the heat should be turned off). They'll thaw as the syrup cools and you can mash them into the syrup before serving.
2)If your syrup turned out thinner than you like, boil it a little longer the next time you make it.
3)For the best flavor and consistency, these syrups are made to be served warm.They will be stiff if you serve them straight from the refrigerator, so set the glass jar in a pan of hot water and let them warm up. Alternately, scoop out a portion of syrup into a small bowl and warm it for a few seconds in the microwave.
4)Once your syrup is cooled enough, you can pour it into a glass jar or bottle, or re-use an old syrup container. It will keep in your refrigerator for up to 2 weeks. If the sugar begins to crystalize, you can put the container in some hot water to re-dissolve the sugar particles.
5)You can use the syrup on pancakes, waffles, oatmeal, biscuits, or even ice cream.
6)Homemade pancake syrup will make a nice gift, with some pancake mix, a spatula, and maybe a frying pan in a basket.
Enjoy:) Read More......
How to Steam Or Boil A Potato In Microwave
The microwave oven not only makes cooking faster but more convenient too.Microwaving potato makes few dirty dishes and also shortens cooking time for any recipe that calls for boiled potatoes.This is great for the busy mom who needs to get dinner ready quick. It is also great for those hot summer months when you don't want to turn on your oven or stove. Cooking them in the microwave is just a faster and cooler way to cook the potatoes.
How to Steam Or Boil Or Cook A Potato In Microwave
Ingredients:-
Potato
Microwave
Microwave safe bowl & cup
Knife
Procedure:-
1) Wash the potato under running water by rubbing it with your hands to remove any dirt.
2) Puncture a few times with a fork/knife.(This is important, as it allows the steam to escape. Otherwise the potato may explode when you cook it.)
3) Place potato on microwave-safe dish along with a microwave safe cup full of water ( water helps prevents the wrinkling of the skin).
4) Cook on high for 4-5 minutes for the first potato, plus 2-3 minutes for each additional potato.
5) Turn over potatoes halfway through cooking.
6) When done, remove the potato from microwave, the skin should peel off pretty easily, but be careful — it’s gonna be one hot potato.
More KITCHEN TIPS
Notes:-
1) You can also chop potato into pieces. Submerg in water in a microwave safe bowl.Add 1 tsp. vegetable oil to help keep the potatoes from boiling over while cooking. Do not cover.Microwave for 6 minutes..... stir and check with a fork (if the fork goes in easy its done) if not try for 3-4 minutes more.
2) Don’t peel the potato until after you’ve microwaved it. If you do, the whole potato gets a tough exterior shell that’s almost impossible to remove.
3) Most nutrients are preserved when potatoes are cooked and eaten with the skin on. If peeling, use a vegetable peeler or sharp paring knife and keep the peeling very thin, since many of the nutrients are found close to the skin.
4) Do not freeze cooked potatoes at home as they become watery upon reheating. The potato is 80 percent water; and when frozen, this water separates from the starch and nutrients.
5) Potatoes are rich in vitamin B, fiber, minerals, as much protein as a half a glass of milk, nearly half the daily requirement of vitamin C, and not to mention its recent rating as the #1 food source of potassium, potatoes are the most complete vegetable in your produce section---and for your belly. Also, don’t forget what potatoes don’t have in them. They have no fat, no sodium and no cholesterol!
6)Times below are for an 8-ounce potato cooking in a 1000 watt oven:
1 potato: 5 minutes
2 potatoes: 7-8 minutes
4 potatoes: 13-15 minutes
Read More......
How To Get Rid Of Burned Food In A Pan
There are lots of online solutions for cleaning really burnt pots and pans, below is some of the easiest & most effective way to get your blackened pot back to its shiny former self.
Method 1 :-
Remove loose bits with a spoon, pour water into the pan and return it to the burner to boil for a few minutes or allow to soak with the heat that remains in an electric burner after you turn it off. For heavy soil, add a squirt of dishwashing liquid for boiling or soaking.
Method 2 :-
1. Discard contents of pot.
2. Scrape out as many loose bits of burnt food as you can with a wooden spoon.
3. Don't use anything sharp or abrasive.
4. Sprinkle baking soda into bottom of pan (about 2 tbsp per cup of water).
5. Add enough water to cover burnt parts by 1-inch and stir; water should look murky.
6. Bring to a boil, reduce heat to medium and simmer for 15 minutes.
7. Remove from heat and discard water.
8. Scrape bottom of pot with wooden spoon. Burnt bits should come right off!
9. If any stains remain, sprinkle baking soda into the pan and add a few drops of water to form a paste.
10. Scrub using a non-abrasive scrubbie. The remaining bits will come right off!
Method 3 :-
Soak overnight in a strong solution of dishwasher detergent & hot water; then wash as usual. CAUTION:- Be-sure the detergent is dissolved and do not use this method on aluminium; dishwasher detergent contains bleach and may discolor the pot or pan.
Method 4:- ( For Stainless Steel ):
Pour full strength vinegar into a blackened or charred stainless- steel pot and let it stand for several days. Replace the vinegar with fresh vinegar and allow to stand for several more days. This method is too strong for aluminium and some other metals but has worked for stainless steel.
OR
1. Fill the bottom of the pan with a layer of water(approx 1 Cup).
2. Add one cup of vinegar.
3. Bring the pan to the boil.
4. Remove the pan from the heat and add the 2 Tablespoon Of baking soda.
5. Empty the pan and scour as normal, if necessary add an extra bit of dry baking soda.
6. If there are any super stubborn marks that don't come off with scouring, make a paste of baking soda and a couple of drops of water. Leave the paste on the marks for a while and return to clean as normal.
More KITCHEN TIPS
Read More......
How To Make All Purpose Basic Indian Gravy In Bulk & Freeze For Quick Meals/ Vegan Recipe
Do you know when you go to any Indian restaurant, how your ordered curry comes in front of you in less than 15 minutes? Because they make all the different kinds of basic gravies ahead of time and freeze for later. So why not do the same with homemade curries..?
As most of the Indian dishes have common ingredients, so preparing and storing when you have some spare time is a great idea or when ingredients are on sale or if you have lot of coming in from your vegetable garden( Like mine:) .So when you're ready all you do is add your favorite veggie to the gravy and cook through .The gravy can be used to make a variety of dishes such as Kofta curry, Corn curry, Baby potato Curry, Tofu Curry, Navratan Korma, Tofu Bhurji etc.
How To Make All Purpose Basic Indian Gravy In Bulk & Freeze For Quick Meals
Preparation Time:- 30 Minutes
Cooking Time:- 30-40 Minutes
Makes:- Gravy for 5-6 Curries approx
Recipe Source:- Preety's Kitchen
Ingredients:-
Oil:- 1/3 Cup
Cumin seeds:- 1 Tbsp
Garlic:- 1 full head of garlic, chopped
Ginger:- 1/3 Cup,chopped
Onion:- 3-4 medium size, chopped
Tomato:- 10-15,medium, chopped
Salt
Turmeric Powder:- 1 Tbsp
Red Chilli Powder:- 1 Tbsp
Garam Masala Powder:- 1 Tbsp
1) Heat the oil on a medium heat, when hot add cumin seeds, as soon as they start to crackle add ginger and garlic and cook until light brown for 1-2 minutes.
2) Add onion and cook until they are translucent.
3) Add tomatoes and all the spices ( salt, turmeric, red chilli powder & garam masala powder), Cook until tomatoes are tender.
4) Switch of the gas, let the tomato mixtures cool down and then blend it until smooth in a blender. Label the bags and fill the gravy ( as much you need for one recipe individually) in the freezer safe zip lock bags.
5)Put all the bags in one big gallon size freezer safe bag to avoid any leakage and pop them into the freezer.
More KITCHEN TIPS
Notes:-
1) When ready to use just take out one small ziplock and put the frozen gravy directly in a pan and heat it on medium-low heat. As soon as it melted you can add anything of your chioce like mix of precut frozen veggeis, or cut tofu or potatoes and peas etc.Let it come to a boil and do the taste test , adjust the seasonings if you want ( you can add any other seasonings if to like fenugreek/kasoori methi powder, coriander powder, cumin powder etc depending on what recipe you are making) and then switch off the gas. Sprinkle some cilantro leaves over the top and serve hot.
2) If you want to make the gravy rich then soak some cashews in warm water for 15 minutes , blend it to make a smooth cream and add along with the veggies . Or alternatively you can add some soy yogurt too.
3)You can also make this gravy with thinly sliced onions and tomatoes (instead of grinding them into pastes).
4) If you like spicy gravy then add green chillies along with onions and then follow the same procedure as specified above. Read More......
How To Toast Nuts
Nuts are naturally high in fat.Toasting nuts is an easy way to makes them crunchier & enhance their flavor.
Spread whole nuts on a baking sheet and toast in a 350 F oven, stirring often, or toast in a large skillet over medium.Use the cooking times below as a guide, but know that nuts quickly go from toasty to burned. Keep a close watch: When you can smell them they are done.
To Toast In Skillet:- To toast just a handful of nuts, use a dry skillet over medium heat. The skillet method is faster since you won't have to wait for the oven to heat up, but it also demands more attentiveness. You'll need to shake and stir pretty constantly to avoid dark or burnt spots. A toaster oven is also convenient for small amounts.
To toast in the oven:- spread nuts on a baking sheet. Bake at 350°, stirring occasionally (Use the above chart for timings)
To toast in the microwave oven:- Place nuts in a microwave-safe dish. Microwave, uncovered, on high for 2-3 minutes or until lightly toasted, stirring twice. Watch carefully to avoid burning the nuts. You may need to adjust the time, depending on your microwave's wattage and the amount of nuts you are toasting.
Tips:-
1) Warmed nuts are easier to chop.
2) Always taste nuts before using; bad nuts will ruin whatever food they're used in.
3) Toasting thin-skinned nuts like hazelnuts or peanuts, makes removing their skins easier. To remove skin from nuts after toasting: Place them in a kitchen towel and rub . Most of the skins will fall right off.
4)To keep nuts fresh longer, store them in the freezer in airtight baggies or containers.
5)Nuts can be toasted a day in advance. Allow them to cool, and then store in an airtight container at room temperature.
6)Sprinkle toasted nuts on yogurt, salad,pasta, brownies or almost anything! Or chop them up and mash together with crushed graham crackers and butter for a scrumptious but easy pie crust.
7) You can toast coconut the same way( oven method), but watch it closely so it doesn't burn.
Enjoy:)
More KITCHEN TIPS
How To Use/Save Leftover Fresh Herbs
DRYING HERBS
There are several methods , but here are two that works best
1) Tie up the herbs at the stem with the kitchen twine. Pierce a small paper bag a few times with a small knife or skewer. Place the bag over the herbs, holding them upright, and close the bag around the stems, tying it with string or kitchen twine.Hang the bag from the stems in a place where it will be out of way-the corner of a closet or cupboard. and let hang for a week or two, until the herbs are fully dried. Crunch up the leaves while still inside the bag, and then pour out the dried leaves, discarding the stems. Store in a small, air tight container.
2) Remove the fresh herb leaves from their stems and mince. Spread out the leaves between layers of dry paper towels. Let these stand for 5 to 8 days, until fully dried. Store in a small airtight container.
FREEZING HERBS
Freezing works for herbs that hold their shape as they dry ( parsley, thyme, mint and rosemary for example) rather than ones that wilt and shrivel up ( cilantro and dill). Make sure the herbs are clean and dry, then mince them. Place in a small air tight container and keep in the freezer until ready for use. They don't need to be thawed prior to cooking with them. Frozen herbs will work well in salad dressings and cooked dishes-like veggie burgers-but less well when they are the headlining ingredient, such as in pesto.
INFUSING OILS WITH HERBS
Fresh herbs make a wonderful infused oils for sald dressings, marinades, and drizzle . Any herb and combination of herbs can be used to infuse oil, but some good ones are basil oil, rosemary oil, tarragon oil, and parsley-thyme oil.
To make infused oil , wash a handful of springs of your favorite herbs and allow them to completely dry. Place the herbs whole in a glass jar or bottle. Warm 1 cup mild oilve oil ( or more if desired) over low heat, then carefully pour over the herbs. Let stand for about a week in a cool, dark place, then strain , discarding the solids. The oil will keep for about 2 months.
Source:- veggie burger cookbook by lukas volger
More KITCHEN TIPS
How To Freeze Fresh Cut/Sliced/Diced Tomatoes
It is possible to quickly freeze raw tomatoes without blanching them first & it's the best way to preserve their fresh tomato flavor to use once tomato season is over.They can be frozen whole, chopped or sliced. It is best to use the tomatoes within one year. Be sure to label and date your freezer bag.
When frozen tomatoes are thawed they do not remain solid and are not suitable for sandwiches or salads. However, frozen tomatoes are a delicious addition to cooked dishes such as curry, soups, sauces,stews & chili etc.There is no need to peel tomatoes before freezing them - the skins will slip right off after being frozen.
Wash all the tomatoes
Wipe nice and clean with paper towel or kitchen towel
Cut out the top part of the core & any bad spots using a knife .
Dice/Slice/Chop tomatoes as desired
Date And Label The freezer bags before filling them
Fill the bags as per your recipe requirement , i put 3 tomatoes per bag as i use that much for any curry i make for the whole family.
Tip from a reader (Donanne Avery):-Stick a straw just inside the bag when it is almost closed and suck out some air...trying not to get into the tomato!
LIKE OUR FACEBOOK PAGE TO SEE DAILY UPDATED RECIPES AND TIPS.
More KITCHEN TIPS
How To Get Rid of Lingering Food Smells
If you have odors lingering in the air from last night's dinner or your apartment/house has an unfriendly smell that you want to get rid of, then follow any of these simple tips to get rid of lingering smells/odors naturally.
* Open Windows :- Fresh air helps any home smell good, and a strategic breeze can carry cooking odors right out the window.
* For Strong Odors: Put out cups of white vinegar overnight on the counter and it absorbs the smell by morning. The scent of the vinegar only hangs around for a couple of minutes and then it goes to work neutralizing the offending odor.
Simmer a small amount of vinegar on the stove and then allow it to remain on the stovetop overnight with the heat turned off
* If the smell is in your sink drain, sprinkle some baking soda in, let it sit for a few minutes, then pour in some lemon juice. After it fizzes up, rinse thoroughly.
* For Deodorizing:- Simmer a pot of water with lemon and orange peels
Boil water with half a lemon and a cinnamon stick. The lemon will add a refreshing scent to the air, while the cinnamon masks the unfriendly odor, filling the room with a fresh nutty scent!
Enjoy:)
LIKE OUR FACEBOOK PAGE TO SEE DAILY UPDATED RECIPES AND TIPS.
More Kitchen Tips
How To Substitute Eggs In Baking/Cooking
If you have wondered about baking without eggs, you will see that it isn’t impossible.Any recipe that calls for eggs can be made vegan by using the proper egg substitute
Powdered Egg Replacer:- Available in health food stores, it is made from potato starch and other leaveners. It has a good binding and leavening properties for baking; it even whips up and will hold soft peaks.
To Replace 1 Egg:- The ratios on the box are a good starting point but depending on your recipe, you may have to play around a bit.
Tofu:-Whipped tofu is another option; it works well in recipes that call for a lot of eggs, such as quiches. It also works well in creamy puddings and pie fillings.
To Replace 1 Egg:-. Whip 1/4 Cup silken tofu in a blender. To use in baked goods, add 1 to 2 teaspoons water to thin the whipped tofu.
Ground Flax seed:- When simmered with water to form a thick mixture, it mimics the binding properties of egg for baking , but it doesn't have nearly the leavening powder of eggs. There is a bonus, however; Flaxseeds are a concentrated source of heart -healthy omega -3 fatty acids.
To Replace 1 Egg:-. Simmer 1 Tbsp ground flaxseed in 3 Tablespoons water until slightly thickened. about 2 minutes. Cool to room temperature before using.(If you buy flaxseed whole , grind it in a clean coffee grinder)
Bananas and Applesauce:- It can be used as an egg replacer in baked goods such as muffins, pancakes or yeast-free quick breads, such as pumpkin bread, and of course, banana bread! Bananas and applesauce add the perfect amount of thick moisture, like eggs, but they won't help your dishes rise or turn out light and fluffy, so be sure the recipe you are using includes a bit of baking powder or baking soda to help it rise if needed.
To Replace 1 Egg:-Use 1/2 to 1 mashed banana or 1/4 cup applesauce for 1 egg.as a replacement
Vinegar & Baking Soda:- Vinegar mixed with water or even plain run-of-the-mill soda can work as a decent egg replacer. Baking soda reacts with the acid in vinegar to bubble up and introduce air, making bakes fluffy.
To Replace 1 Egg:--1 teaspoon of baking soda along with 1 tablespoon of vinegar. Apple cider vinegar and white distilled vinegar can be used.
Buttermilk/Yogurt:- This is good in some cakes, bars, muffins and quick breads. Yogurt would need to be used with baking powder to avoid a dense bake.
To Replace 1 Egg:-Replace the liquid in the recipe with same amount of buttermilk or thinned yogurt. Replace baking powder with 1/4 as much baking soda. OR 1/4 cup yogurt can be substituted for every egg
Other Substitutions:-
- 2 tablespoons of cornstarch beaten with 2 tablespoons of water. This, too, works much like vegetarian egg replacer.
- High in protein, chickpea flour works both as a binder and leavener and, in my opinion, one of the best natural egg replacers for baked goods. To substitute mix 3 tbsp flour with 3 tbsp water for each egg, until thick and creamy
- Fatty and thick, coconut milk can be used to replace whipped egg yolks.
- Raw cashews, soaked and ground to a smooth cream, have very similar properties (high in fat and protein) to whipped egg yolks
- 1 heaping tbsp soy powder + 2 tbsp water = 1 egg
- 1 tbsp soy milk powder + 1 tbsp cornstarch + 2 tbsp water = 1 egg
- 1/4 cup mashed potatoes, applesauce, canned pumpkin or pureed prunes = 1 egg (consider taste profile of finished recipe)
- 1 Tbsp. plain agar powder dissolved in 1 Tbsp. water, whipped, chilled, and whipped again = 1 egg white
- For savory entrees such as a vegetarian casserole or a loaf, try using 2-3 tablespoons of bread crumbs or oats.
- Unflavored Gelatin It binds both solids and liquids very well in almost a fluffy manner
- Dry Substitutions for Egg: 2 tbsp cornstarch OR 2 tbsp arrowroot flour OR 2 tbsp potato starch = 1 egg .
How do you know which egg replacer to use? (From About.com)
In a cake, the eggs serve as a leavening agent, helping to make the cake light and fluffy. In baked goods such as cookies and muffins, the eggs add moisture and act as a binder, gluing all the other ingredients together. And, if you're looking to substitute eggs in a quiche or a mayonnaise, where eggs are central to the finished product, you'll probably need something like tofu to mimic the consistency of the eggs, while making other adjustments to the recipe as well to add flavor and body.
As a general rule, the fewer eggs a recipe calls for, the easier they will be to substitute. So, if a cookie recipe calls for one egg, using an egg substitute will work much better than in a recipe that requires three or four eggs. Also consider how the substitute will affect the overall taste of the finished dish. Bananas, for example, may add a welcome hint of fruity sweetness to pancakes and cookies, but if you are making a casserole or another savory dish, you will want to use something else.
Enjoy:) Read More......
How To Store Tongs Safely In The Kitchen Drawer
Tongs are one of the essential kitchen utensil. We use them for turning food in skillets and on the grill. But storing them in a drawer is not that easy along with other tools.They can become tangled with other tools and sometime it even prevents the drawer from opening.Here is the safe way to store the tongs.
Store the closed tongs into the cardboard tube from a roll of plastic wrap or paper towel. This way they can be stored in the drawer without opening or interfering with other tools.
While cooking with tongs, place the tongs in a heavy beer mug to keep your stove top or counter clean.
Read More......
Subscribe to:
Posts (Atom)


